Splunk is a log analysis tool used extensively by Security Analysts to analyze logs. Organizations use Splunk to collect and centralize logs from different sources like Windows/Linux machines, firewalls, web applications, cloud platforms (AWS/Azure), and security tools. This massive set of logs can be difficult to investigate. In comes Search processing Language (SPL). SPL helps investigators parse through millions of events quickly and efficiently. This becomes crucial during incident response when analysts need to identify suspicious activity and understand the impact of the attack.
In this blog, we will be using Splunk to investigate a security incident and understand how SPL queries can be used to identify the compromised account, track unauthorized access, and uncover attacker motives.
Scenario
An organization utilizes AWS to host critical data and applications. An incident has been reported that involves unauthorized access to data and potential exfiltration. The security team has detected unusual activities and needs to investigate the incident to determine the scope of the attack.
Questions
Question 1: What is the username of the compromised user?
Step 1: Open Splunk and go to ‘search and reporting’.
Step 2: In the New Search field, type index=”aws_cloudtrail”
Step 3: We see there are 4032 events listed. Now we have to filter these events to find the username of the compromised system.
Step 4: If we scroll down the left side of the screen, we see different sections- Selected Fields, Interesting Fields. Under them if we scroll down we will find the options userIdentity.userName and userIdentity.arn
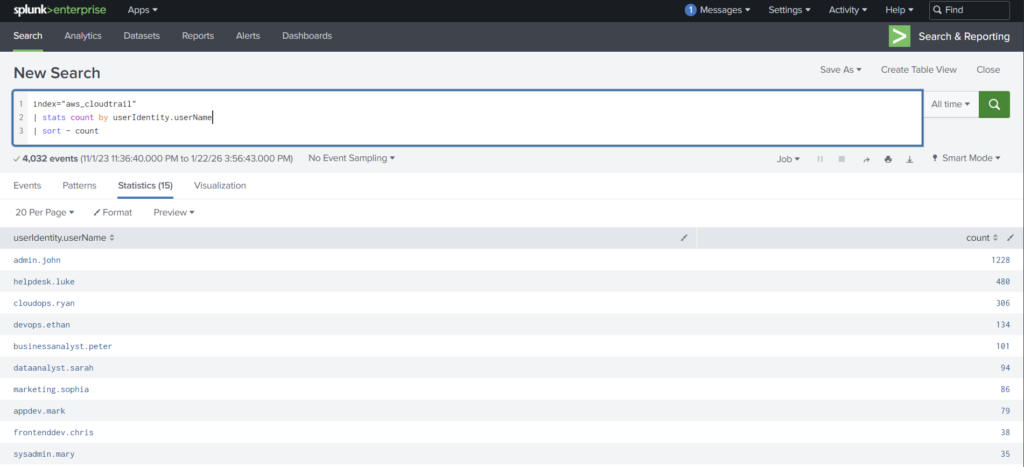
Step 5: We can list out the user names using the SPL:
index=”aws_cloudtrail” | stats count by userIdentity.userName | sort – count
What is happening here? We are using the index aws_cloudtrail and creating two columns. One is where we list the usernames and other is the count of corresponding usernames in the log.
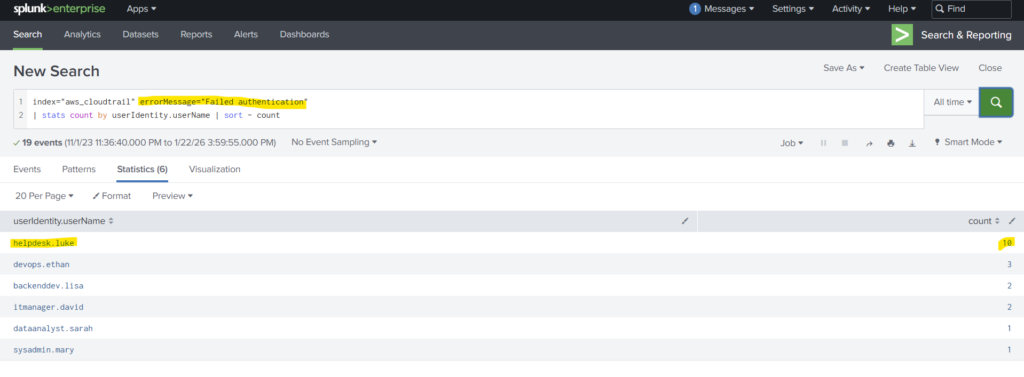
Step 6: However the above command will only list the usernames and will not help us to answer the question. To get the proper answer, we add the command errorMessage=”Failed authentication”
Why this worked? Because we told splunk to filter the logs and show us only those CloudTrail events where authentication failed. This means usually the Failed authentications, wrong login attempts and failed console logins are all listed.
Question 2: What is the timestamp for the first access to an S3 object by the attacker?
In this question we have to,
Look only at the attacker’s activity (compromised user)
Look only at S3 actions
Look only at actions that involve accessing objects
Find the earliest timestamp
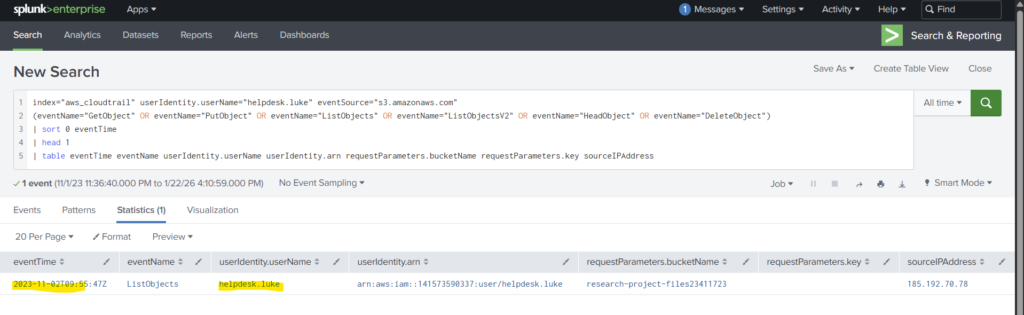
Step 1: Now that we know the username of the compromised system, we need to add other commands to find the access to the S3 object.We start the SPL command with index and userIdentity.userName as helpdesk.luke. Now we add a new command eventSource to list only those events where S3 object was accessed.
Step 2: Next we add the eventName command to represent real interaction with objects in S3. We add the event types GetObject (downloading/reading an object), PutObject(uploading/writing an object), DeleteObject(deleting an object), HeadObject(checking object metadata), ListObjects / ListObjectsV2(listing objects in a bucket).
Step 3: Sort command helps sort the matching events by eventTime in ascending order. Head 1 command gives us the first result. The table command gives us the events in organized order in a table format.
index=”aws_cloudtrail” userIdentity.userName=”helpdesk.luke” eventSource=”s3.amazonaws.com” (eventName=”GetObject” OR eventName=”PutObject” OR eventName=”ListObjects” OR eventName=”ListObjectsV2″ OR eventName=”HeadObject” OR eventName=”DeleteObject”) | sort 0 eventTime | head 1 | table eventTime eventName userIdentity.userName userIdentity.arn requestParameters.bucketName requestParameters.key sourceIPAddress
Question 3: Among the S3 buckets accessed by the attacker, one contains a DWG file. What is the name of this bucket?
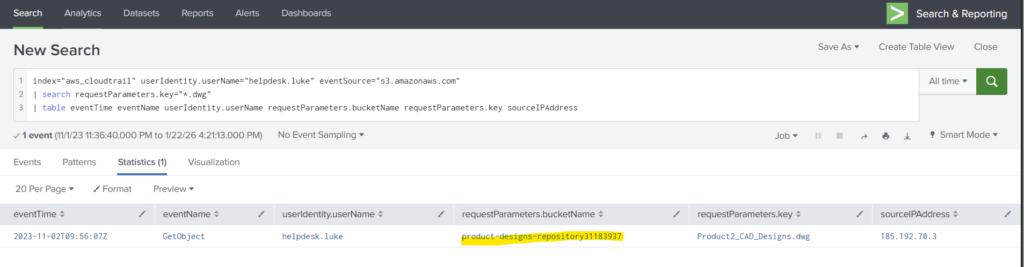
Here the question asks us to find the log which contains a DWG file.
Step 1: We can just tweak the above command a bit to answer the question. We do not need sort and head command here, instead we can replace it with search command.
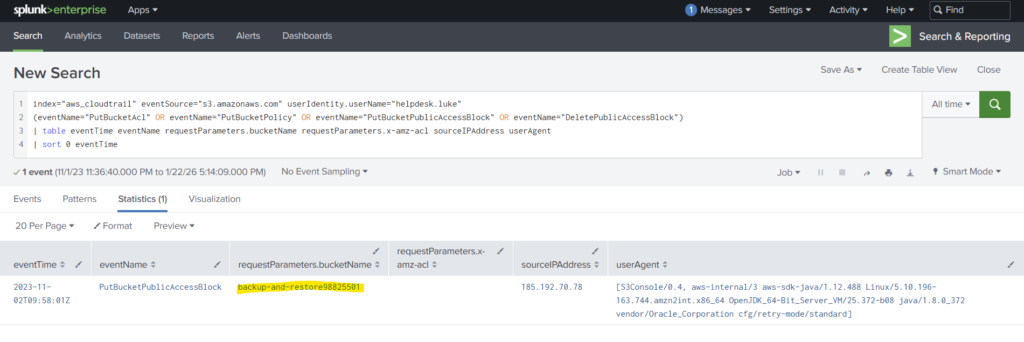
Question 4: We’ve identified changes to a bucket’s configuration that allowed public access, a significant security concern. What is the name of this particular S3 bucket?
Step 1: Since this question asks for S3 bucket name, we can reuse the command from Question 3. But instead of using the eventName command for object reference we use it for Bucket reference. The command is as follows:
index=”aws_cloudtrail” eventSource=”s3.amazonaws.com” userIdentity.userName=”helpdesk.luke” (eventName=”PutBucketAcl” OR eventName=”PutBucketPolicy” OR eventName=”PutBucketPublicAccessBlock” OR eventName=”DeletePublicAccessBlock”) | table eventTime eventName requestParameters.bucketName requestParameters.x-amz-acl sourceIPAddress userAgent | sort 0 eventTime
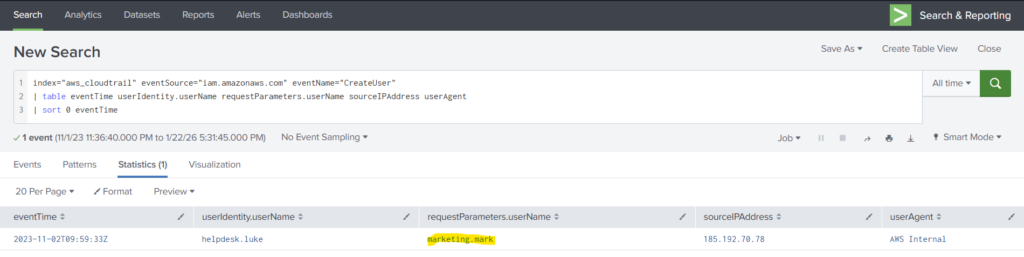
Question 5: What is the username of the account created by the attacker?
Step 1: We can just modify the eventName command value as CreateUser. This will give us the new user name created by the attacker.
This lab helped us understand how Splunk can be used as a practical tool for investigating real-world security incidents. Instead of manually reading thousands of log entries, we used SPL queries to filter, sort, and extract meaningful information from AWS CloudTrail data. Overall, this was a great hands-on exercise to strengthen our Splunk skills for cloud-based threat hunting. Bye!!