
Introduction
Today I am going to discuss a little about a very renowned tool that is widely used by individuals and companies for Digital Forensics. The tool is called Volatility. Volatility is based on python and hence is very versatile and powerful. This tool is available for all types of OS:- Windows, Mac OS and Linux. Volatility is a tool for digital forensics and malware investigations developed by The Volatility Foundation. It is a free and open-source software that is available for download on the internet. The framework was first released on 2007. The link for the download is- “https://github.com/volatilityfoundation/volatility3”.
In modern cyber attacks, adversaries often rely on fileless malware, in-memory execution, and living-off-the-land techniques to evade traditional disk-based detection. In such cases, analyzing only disk artifacts is insufficient. This is where memory forensics becomes critical, as volatile memory contains valuable evidence such as running processes, injected code, network connections, encryption keys, and command history. From the viewpoint of a security analyst, memory forensics plays a indispensable role in understanding the attacker’s action during and after the security incident.
Volatility framework is a popular tool that helps the investigators to analyze memory dumps and dig up malicious activity that may not leave traces on disk. Using Volatility, analysts can identify hidden or terminated processes, detect code injection, analyze network connections, extract credentials, and also detect indicators of compromise (IOCs) directly from system memory. Tools like Volatility is the bridge between detection and investigation as it provides deep visibility into the system at the time of compromise
What is Volatility Workbench?
Now let’s discuss about Volatility Workbench. Volatility Workbench is GUI-based version of Volatility built on top of the Volatility memory forensics framework. Security analysts get a more interactive and user-friendly way to analyze memory dumps, especially those who prefer visual representations over command-line output.
Why Volatility Workbench? While Volatility offers powerful forensic capabilities, its command-line nature can be challenging for beginners or during fast-paced investigations. Volatility Workbench simplifies this process by organizing plugin outputs into structured views, allowing analysts to easily examine running processes, loaded DLLs, network connections, and other memory artifacts.
Volatility Workbench is commonly used by SOC analysts, incident responders, and forensic investigators to quickly systematize memory images and identify suspicious behavior. This helps curtail analysis time while maintaining the analytical depth provided by the Volatility framework. Although Volatility Workbench enhances effectiveness, it still relies on Volatility plugins for analysis. Sometimes Analysts may combine both the GUI and command-line approaches to achieve deeper forensic understanding and perform advanced investigations.
Volatility Workbench can be downloaded from the link “http://osforensics.com/tools/volatility-workbench.html“
What are the differences between Volatility and Volatility Workbench?
In the following table, we will take a look at some of the differences between Volatility and Volatility Workbench.
| Categories | Volatility | Volatility Workbench |
| Style of Execution | Volatility is command-line based, scalable and also automatable. | Volatility Workbench is GUI-based, mouse-driven and visualization in the form of table and lists. |
| Use | Volatility CLI is used in real-world for large-scale investigations, automating repeatable investigative tasks and advanced malware hunting. | Workbench is used mainly by beginners for learning, grasping the idea of malware hunting, teaching and also one-off investigation. |
| Automation and Scripting | Volatility can be integrated with python and bash scripts and SOAR tools. | No such integration is available for Workbench. |
| Speed | Volatility brings in speed and scalability for large-scale investigations which is required in real-world scenario. | Unlike Volatility, Workbench slows the investigation and hence is not reliable in real-world scenarios. |
| Flexibility | CLI gives us full access to various plugins- both custom as well as community plugins. | It is limited to the in-built plugins and is also less flexible since plugin updates depend on Workbench support |
| Volatility3 Support | CLI supports Volatility3 which is the latest framework. | There is limited support for Volatility3 making it less reliable for senior security analysts. |
Lab Time-Ramnit
Now, let’s see a practical example of how we can use Volatility Workbench. For this I have taken the Ramnit lab. The scenario of the lab is:
“The intrusion detection system of an organization has alerted us to suspicious behavior on a workstation, pointing to a likely malware intrusion. A memory dump of this system has been taken for analysis. Our task is to analyze this dump, trace the malware’s actions, and report key findings.”
Step 1: First we open the Volatility Workbench.
Step 2: Next we open the given memory dump file from the lab in VW(Volatility Workbench).
Step 3: After the memory dump is opened as an image file, we must choose the platform as ‘Windows’.
Step 4: Now we must find the process that is responsible for suspicious activity. To find the process, we need to select the Command ‘windows.pstree.PsTree’ from the drop-down menu.

Step 5: The trick to find the malicious process is to pick the one that looks suspicious. In this case, we can tell ChromeSetup.exe is the suspicious process. Why? Because ChromeSetup process cannot run actively. Installers are one-time process and hence should run only once but not continuously.
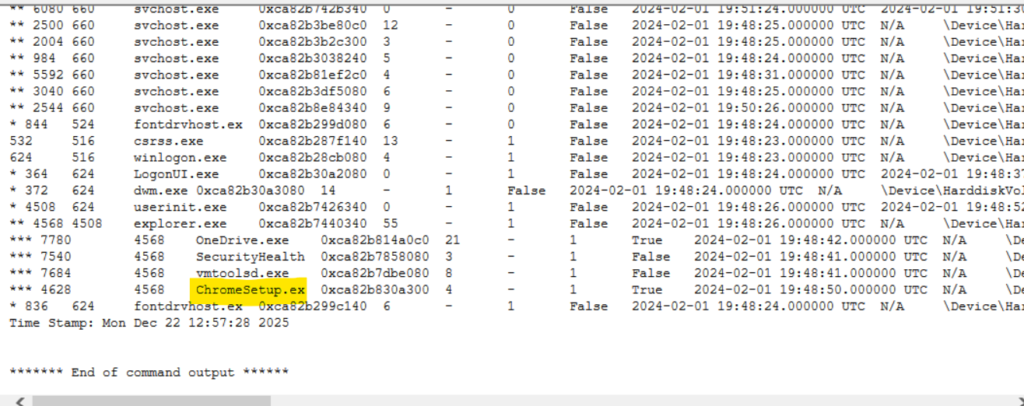
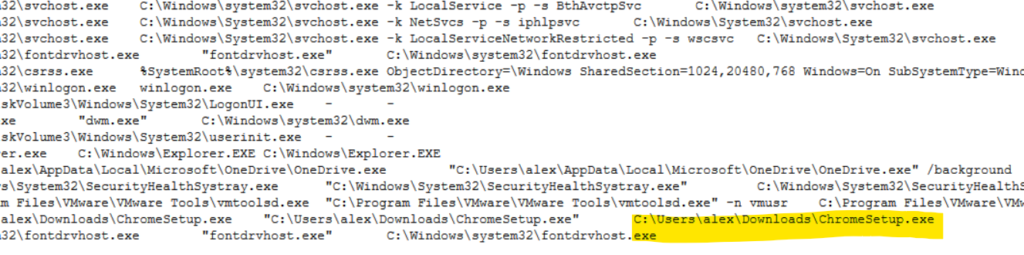
Step 6: We can also find the exact path of the executable on the right side of the process.
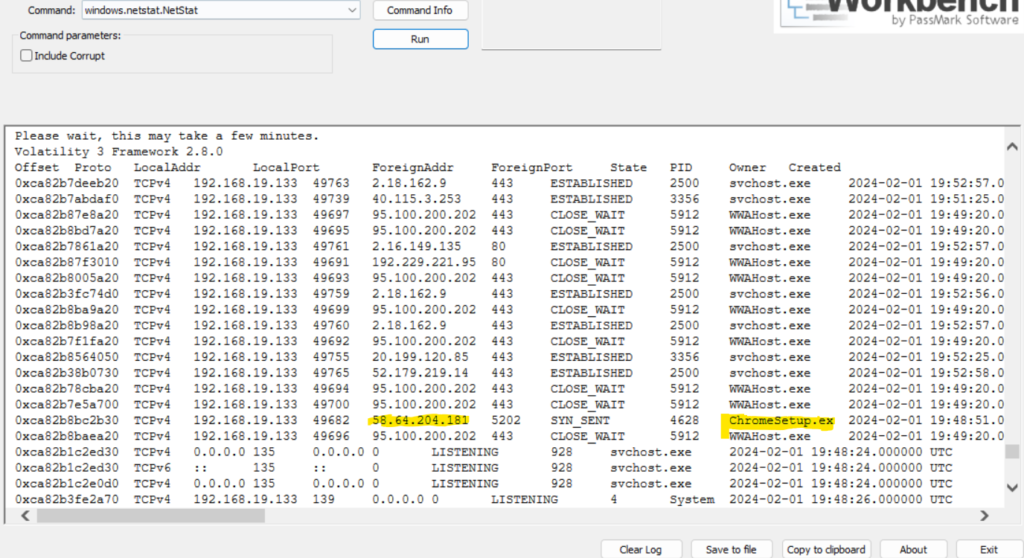
Step 7: Identifying network connections is crucial for understanding the malware’s communication strategy. So how to find what IP address did the malware attempt to connect to? This can be done using the ‘windows.netstat.NetStat’ plugin. Select the plugin from Command and select Run. Under the ForeignAddress column, corresponding to the ChromeSetup.exe process. This will tell us the IP Address that the malware communicated with.
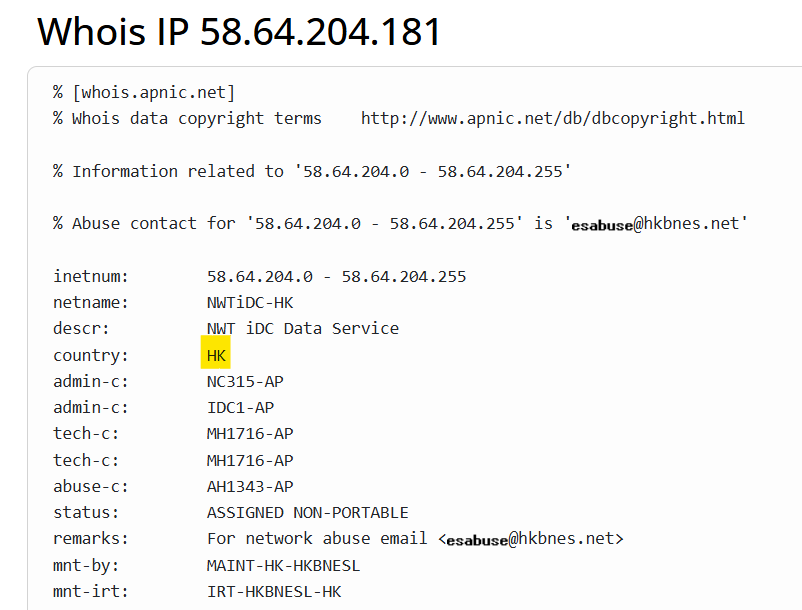
Step 8: To understand the origin of the malicious IP Address, we can perform a WHOIS IP Address lookup and determine the geographic location. Here we see that the attack originated from Hong Kong.
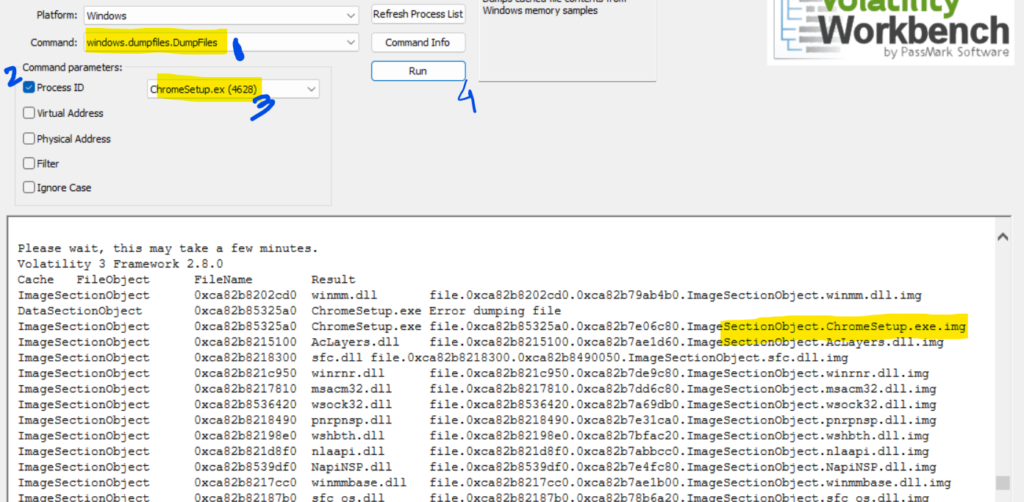
Step 9: Hashes serve as unique identifiers for files, assisting in the detection of similar threats across different machines. We can get the SHA1 hash of the malware under the disguise of ChromeSetup.exe also. How? Well, what we can do is first dump the file using the ‘windows.dumpfiles.DumpFiles’ plugin and the mention the procees id which in this case is 4628. Then hit Run.
We can check our local machine where the memory dump file is, we will see the dumped file. Once the file is dumped, we can upload the file to VirusTotal and dump to calculate the SHA1 hash of the executable. As an alternative, we can also calculate the hash using GetFileHash command in powershell but most probably if our Windows Defender is active, then it will block powershell from calculating hash of the file.
Step 10: To bring together the events of investigation, we can check the details tab in VirusTotal and check the Creation Time under the History Section.
Step 11: Identifying the domains associated with this malware is crucial for blocking future malicious communications and detecting any ongoing interactions with those domains within the organizations network. We can get this information from VirusTotal itself in the Relations tab under contacted domain.
Conclusion
As a beginner who is starting their journey in memory forensics, Volatility Workbench is the best free tool in the market. It’s GUI-based platform is easy to use and can be used to perform one-off investigations without the heavy learning that comes with CLI. However, as we have seen above Volatility Workbench can not be used to automate scripts or perform advanced memory forensics.
In future posts, I will explore more advanced labs using Volatility to demonstrate deeper memory forensic techniques.